Module pool in SAP ABAP
Module Pool Programming, also known as Dialog Programming, is a technique in SAP ABAP (Advanced Business Application Programming) used to create custom interactive applications. Unlike standard report programming, which typically generates an output without user interaction, Module Pool Programming allows developers to design complex screens and interfaces that interact with the end-user.
Benefits of Module Pool Programming:
Custom User Interfaces: Allows for the creation of tailored user experiences that meet specific business requirements.
Interactive Applications: Facilitates real-time user interaction, enhancing data accuracy and user engagement.
Integration: Can be integrated with other SAP modules and external systems to provide comprehensive solutions.
Example Use Cases:
Data Entry Forms: Custom forms for entering and managing business data.
Complex Transactions: Processes that require multiple steps and validations, such as order processing or inventory management.
Custom Reports: Interactive reports where users can filter and manipulate data dynamically.
Transaction / Dialog pool programming / Module Pool Programming
A transaction is the collection of sequential screens which accept the input & display the output.

It’s also called as Dialog Pool Programming since we have interaction between screens. It’s also called as Module Pool Programming because the flow logic of each screen acts as a module. So it’s a pool of module.
Note: – A transaction code contains either executable program or module pool program.
Differences between executable program and Module pool in SAP ABAP
Executable Programme
1. We can execute the executable program either through transaction code or directly.
2.Type of executable program is ‘1’.
3. All the standard reports are executable programs.
Ex – ME2L,ME2K,ME2M
Module Pool Programme
1. We can execute the Module pool program only through transaction.
2.Type of Module Pool program is ‘M’.
3. All the standard reports are Module pool programs.
Ex – XK01,XD01
Steps to create transaction code for executable program: -
-> Execute ‘SE93’.
-> Provide the transaction code. Click on create.
-> Provide short text. Select the radio button program and selection screen. Enter.
-> Provide the program name.
-> Select the GUI check boxes. Save. Check.
Note: – In the real time when ever we develop a new object other than enhancement then we must create transaction code.
Steps to work with module pool program: -
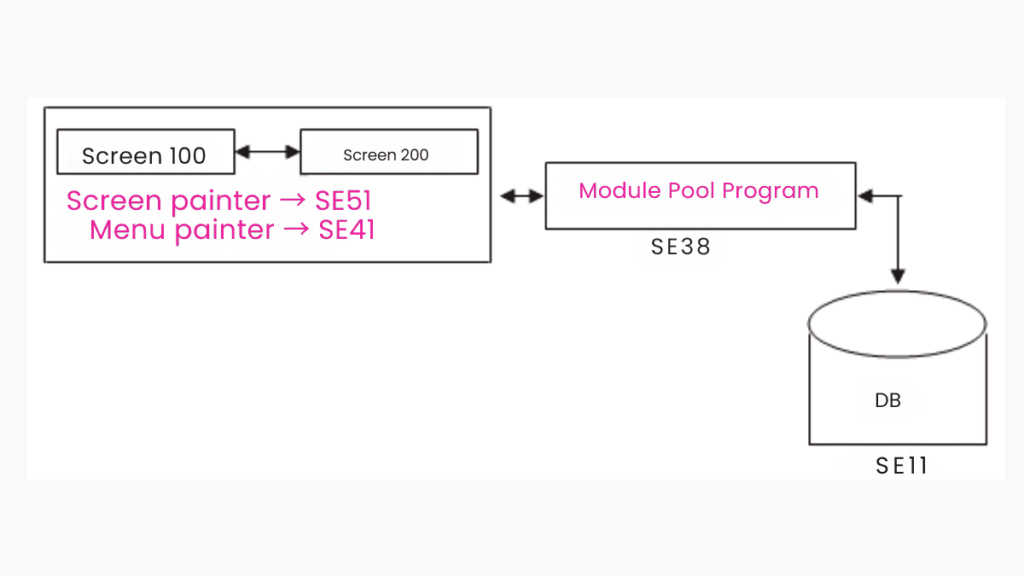
1. Create a module pool program (in SE38) & implement the logic.
2. Design the required screens (in SE51) & attached to the program.
3. Design the required menus (in SE41) & attached to screen.
4. Design the database tables (in SE11) & as per client requirement.
5. Create the transaction code (in SE93) & run the module pool program.
These 5 steps, we can work with single transaction. I.e. SE80 (Object Navigator).
Steps to create the module pool program: -
Step 1:
-> Execute SE80.
-> Click on ‘Edit object’ in the application tool bar.
-> Click on program tab. Provide program name.
-> Click on create.
-> Remove the check box TOP INCL. Click on enter.
-> Select the type is module pool. Enter.
-> Click on save, local object. Select the program name.
-> Provide program name in left panel. Enter, save.
Step 2:
-> Execute SE38.
-> Provide the program name.
-> Click on create. Provide title.
-> Select the type is module pool.
-> Click on save, local object. Click on display object list in the application tool bar.
Working with screen painter:
Screen painter also called ABAP Screen painter is a tool which contains both the graphical as well as alpha numeric mode. The screen painter tcode is SE51.
Screen Painter in SAP ABAP is a development tool used to design and customize user interfaces for SAP applications. It is part of the SAP GUI and is integrated into the ABAP Workbench (also known as the SE80 transaction).
Components of screen painter:
1. Attributes
2. Layout
3. Element list
4. Flow logic editor
Attributes: –
Attributes specify the type of the screen whether it’s a normal sub screen or model dialog box.
Layout: –
Layout is the collection of screen elements. I.e. check box, radio button, input output field, push
button, table control, tab strip, etc.
Element list: –
Element list contains the screen elements which are designed on the screen & their data types & lengths.
Flow logic editor: –
Flow logic editor contains the logic related to the screen.
Events in flow logic editor: -
1. PBO (Process Before Output)
2. PAI (Process After Input)
3. POV (Process On Value-request)
4. POH (Process On Help-request)
PBO: –
It’s an event which is triggered before display the screen.
ADV: – This is used to provide the default values to the screen.
PAI: –
It’s an event which is triggered after provide the input to the screen.
ADV: – This is used to implement the logic.
POV: -It’s an event which is triggered at the time of user clicks on F4 button.
ADV: – This is used to provide the list of possible values to the input variable.
POH: -It’s an event which is triggered at the time of user clicks on F1 button.
ADV: – This is used to provide the help document to the input variable.
Note: – The communication between flow logic editor to ABAP editor is always through screen elements. I.e. each element in the screen we must declare on equality declaration in ABAP editor.
Steps to work with module pool program as per ABAPer point of view: -
1. Create the module pool program
2. Design the required screens
3. Maintain the equality declaration in ABAP editor
4. Maintain or implement the PBO and PAI logics of each screen
5. Create the transaction code to run the program
Note: – If we are working with only one screen then the back button functionality of the screen is either leave to screen 0 or leave program.If we are working with more than one screen then the back button functionality of the first screen is leave program, from second screen on wards leave to screen 0.
Design the screen as shown in the below.
After the user provide the input1 and input2 click on addition button then we display the output in the result field. If the user clicks on back button then we go to program.
Design the screen: -
-> Select the program in left panel. Right click on it. Create -> screen.
-> Provide screen number (4 digit). Enter.
-> Provide short description. Click on save.
-> Click on layout in the application tool bar.
-> Design the screen abaper client requirement.
Screen designing: -
-> Select the text field screen element. Draw it. Double click on it. Provide the name, text.
-> Select the input output field screen element. Draw it. Double click on it. Provide the name.
-> Identify the data type & length.
-> Repeat the same steps for all other fields.
-> Select the push button screen element. Draw it. Double click on it. Provide the name, text, function code.
-> Repeat the same steps for back button. Select the box screen element. Draw it.
Steps to activate the program: -
Double click on program in the left panel. Right click -> Activate. Enter.
Steps to create the transaction code: -
-> Select the program in the left panel. Right click, create -> transaction.
-> Provide the transaction code, short description. Enter.
-> Provide the program name, screen number. Select the GUI checkbox. Save.
Steps to execute the program: -
Select the transaction code in the left panel. Right click -> execute -> direct processing.
Programming: –
DATA A(10) TYPE C.
DATA B(10) TYPE C.
DATA R(10) TYPE C.
MODULE USER_COMMAND_1000 INPUT.
IF SY-UCOMM = ‘ADD’.
R = A + B.
WRITE R.
ELSEIF SY-UCOMM = ‘BACK’.
LEAVE PROGRAM.
ENDIF.
ENDMODULE.
Flow logic of 1000 screen: –
PROCESS BEFORE OUTPUT.
* MODULE STATUS_1000.
PROCESS AFTER INPUT.
MODULE USER_COMMAND_1000.

